follow mefollow mefollow mefollow mefollow mefollow mefollow me
Showing posts with label Doodlecharms. Show all posts

Monday, August 27, 2012

{Back to School} Let's Roll into School Teacher Gift with Tag Printable

For this year's "Meet the Teacher" night I wanted to create a special gift for Spencer's Kindergarten teacher.  I really like to personalize my gifts so that they can keep them for years to come.  This is what I came up with this year.  Each side is decorated in a school themed image.  I love "play on words" so I created the Let's Roll into School tag because I was filling the jar with Tootsie Rolls.  ☺


I found this square glass jar at Dollar Tree.  I really liked the size and thought of so many ways to decorate it.  Decisions! Decisions!

Here is my supplies.


I wrapped Washi Tape around the outside of my glass jar. 
Works WONDERFUL!


To decorate the outside of the jar ~ I decided to cut out vinyl images on my Cricut and layered them on each side of the glass jar. 
Apple & School Bus ~ Doodlecharms by Cricut
ABC ~ Recess Lite by Cricut
Chalkboard ~ George and Basic Shapes by Cricut
(I used 2 rounded rectangles making one a little smaller to fit inside)

Side 1 with Chalkboard
Side 2 with Apple
Side 3 with School Bus -- personalized with School Name!
Check out my "blingy" hubcaps - (love)
Side 4 - ABC letters
I filled a plastic treat bag with yummy Tootsie Rolls and tied various ribbons to close the top.


Here is the tag I created to go along with the gift.   I attached it to the bag of tootsie rolls using red & white twine.

Feel free to download this free tag and use it for yourself.

{Personal use only please} 

Right click and save as to your computer.  
Insert into a word document or other source and print your tag.
I hope you've enjoyed today's project and thank you so much for your comments.  

♥Tracy
__________________
Find more here:

Craft Junkie Too Friend
Pin It

Tuesday, April 24, 2012

Teacher Appreciation Gable Box


Hi everyone and thanks for stopping by....

I'm excited to share my Teacher Appreciation Gable box as part of the monthly design team project post for My Pink Stamper.  You can check out all of our projects here.


Supplies:
  • 1 - Kraft colored Gable Box - Target's Dollar Spot
  • Designer Paper in school/teacher design
  • 4 red buttons
  • black cardstock
  • yellow rick rack
  • apple die cut - Doodlecharms Cricut cartridge
  • white gelly roll pen
  • "Whisper White" ink by Stampin' Up for sentiments
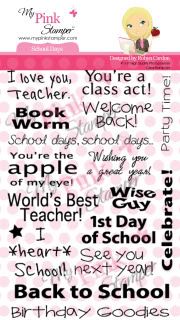
  • Sentiment - "World's Best Teacher" & "I Love You, Teacher" - School Days collection by My Pink Stamper
  • various ribbons


Directions:
  • Lay gable box flat and measure paper the size you would like.  Cut with scissors or trimmer to the size around the bottom of the box.  Glue down around box. You may need to piece the paper together to get it to pattern around the box (this is what I did).
  • Measure black cardstock on angle of box and cut out with scissors; doodle with white pen, stamp one side World's Best Teacher and other side "I Love You, Teacher". Gllue onto box.
  • Glue yellow rick rack around top edge of box.
  • Cut out one apple from Doodlecharms at 1 1/2".  Doodle with white gelly roll pen. I used one pop dot to give the apple more dimension.  Place in center of box. 
  • Form box
  • Add buttons with glue dots
  • Fill box with your gift, trinket, gift card or special treat.
  • Tie box closed with various coordinating ribbons.

Click here to view more MPS Stamps!


To see the rest of the My Pink Stamper's Design Team projects -- please click here. 
Pin It

Sunday, March 04, 2012

{ Bunny Lollipop Treats }


Supplies
See video for measurements & detailed picture instructions
Cardstock
Scor-Buddy or Score-Pal
Bunny - Doodlecharms by Cricut - page 88 "blackout" function key
"Happy Easter" by My Pink Stamper (Happiest Moments collection)
 pom poms, ribbon, pop up dots
markers, chalk 
suckers


I hope you have a fantabulous week! 

Pin It


Linking up at these fun parties this week!


Pin It

Tuesday, October 25, 2011

My Pink Designers Design Team Day Project - From Your Secret Santa Card

Welcome to the October edition of the My Pink Designers Design Team day hosted by Robyn, My Pink Stamper.  Today the team is creating cards using the Winter Treats & Sayings OR Biggie Christmas stamp sets SO if you are needing a little inspiration to kick of the 2011 holiday season you are in for a treat!

Several years ago, I hosted a Secret Santa gathering at work and it was so- much -fun.  There was about 16 of us so we were able to spread out the spirit.  If you don't know what a Secret Santa is an explanation from Wikipedia, the free encyclopedia:
Secret Santa is a Western Christmas tradition, in which members of a group or community are randomly assigned a person to whom they anonymously give a gift. Often practised in workplaces, or amongst large families, participation in it is usually voluntary. It offers a way for many people to give and receive a gift at low cost to those involved.
There are various traditions and ways in which a "Secret Santa" is run. In some variations, as Christmas approaches, names of participants are placed in a hat, and participants draw the name of a person for whom to buy a gift. Along with name submission, each participant may also submit a short wish-list of items from which the gift-giver can choose. There is often a limit to how much can be spent on the present. Presents are then sometimes exchanged anonymously. Many schools and offices do this at Christmas time, often as a cost-saving effort. It usually takes place prior to Christmas because the office and school settings require it. Sometimes people leave hints in cards on desks, others create other special ways to make themselves known. 
For ours….I developed a simple questionnaire that included random questions like favorite snack, candy, scent, holiday season event, collections, favorite places to go out to eat, shop, visit etc.  Then each person drew a questionnaire out of the bucket and that was their person to be the "Secret Santa" for.  Since I was the hostess.  We did set some limits because as you know with every thing you do there is always those who over spend or under spend, over give or don't give enough…..so we all agreed to giving something at least once a week until the week before Christmas then we'd send a little something each day, our Secret Santa's would be revealed at our annual Christmas party for the group.    It was so much fun!!  We really need to do that again……hmmmm….

Onto Today's project…...


Supplies:
Santa ~ Cricut Doodlecharms

Embossing folders ~ 
Swirls by Sixxix (santa's beard), Swiss Dots by Cuttlebug (brim of hat and ball of hat)
Plaid by Sixxix (Santa's hat (red part))

Santa's beard & eyebrows ~ yarn

Santa's nose ~ pink brad

red chalk for Santa's cheeks

border punch for green ~ Ribbon Loop by Martha Stewart

"From your Secret Santa" sentiment ~ Winter Treats & Sayings by My Pink Stamper


Pin It

Monday, October 12, 2009

Halloween Candy Bar Treats & Video #43


Looking for a cute creative way to jazz up your candy bars this halloween? Then watch these 2 video's for my tips on how you can create these cute and simple projects.

In Part 1.....I will show you how I create the wrapper using the pumpkin from Cricut Doodlecharms.
Pin It